How-to:
Looking for a Quick walkthrough with screenshots?
See the Step-by-Step Visual Guide
Table of Contents
Installation
Download Instructions
Download and install the Windows MSI file below:
- T2200-Generator_25.1.msi
- T2200-Generator_25.1.msi (purchase required)
Double click on the downloaded file, and follow the installation instructions.
Download Excel Template Starter File:
2025 Version:
2025 Excel Template File, click here to download2024 Version:
2024 Excel Template File, click here to downloadFind and Start the Application
After installing you can find the application by:
- Clicking Start button and type T2200
- Pressing the windows icon and scroll through your applications until you find the T2200 Generator application.
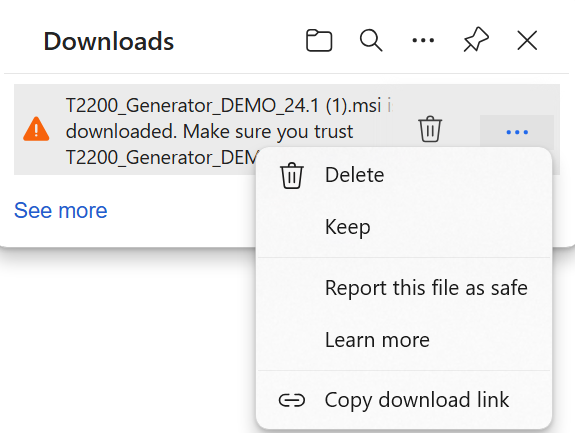
Can’t find your Download File?
T2200 generator is not a common application; it is a niche application. Windows will likely add a caution to the download, and you must click the three dots and select keep file.
Smart Screen Warning: You may also get a smart screen warningwhen you try to open the application for the first time. This is because the application is not common and has not yet built up a reputation with Microsoft. You can bypass this by clicking on more info and then click on run anyway.
Download Help: You can typically find your downloads in your downloads folder or press ctrl-j in your browser to view downloads. Select the T2200-Generator-v202x.x.msi file.
Need assistance: help@t2200.ca
Getting Started
Main Idea
The main idea is to have all your data prepared in Excel. You can then load it into the program, set your signature, and have the program fill out the PDF file and save it to your desired folder or directory. All your work is in Excel.
Step 1: Fill out Forms Data in Excel
You'll need an Excel spreadsheet containing all the questions and answers for a T2200 Form. Next load that spreadsheet into the T2200 Generator Application. Here's the template you must use:
Excel Template File, click here to downloadEach row represents a single person, and you must answer all the questions where applicable. For each row, a PDF will be generated for that person.
Step 2: Load Excel
Once you have saved the Excel file in Step 1, you can now import and load Excel into the the T2200 Generator Application. Click select Excel file button and point to your Excel file.
Ensure you do not see any errors in the error output area
If there are errors please fix in the Excel file, and reimport your Excel file.
Step 3: PDF Save Location
You'll need to choose a folder or directory to where you want your populated PDF files to be saved.
You should create a new folder to store the PDF files.
Pro Tip: You should create a new folder to for each run. That way you won't mix up different versions of PDF files
Step 4: Signatures
You have the option to choose between two types of Signatures: text based and imaged based signatures. You can't use both.
You must select one type, either:
- Text based — Enter the name for the signature. It will be printed in a cursive-style font. This results in a clean signature with no image scaling issues.
- Image based — Load an image of your signature and it will be embedded into the PDF file. Aim for a 10 to 1 ratio (width to height). The signature area is a wide, low rectangle. A square or tall image will appear skewed because the program scales it to fit the area.
You can leave it blank and sign each one manually (i.e. if you want someone else to review and physically put their signature on it using a third-party PDF application, say through DocuSign or Adobe's signature functionality)
Specific Topics
Excel
You need to use the Excel Template.
Restriction On Columns
The Excel template must be used since the columns must be in that specific format. Any changes to the Excel template may cause errors. Do not add or remove any columns that are highlighted with otherwise the generator could load the wrong column data. You can add columns at the end of the highlighted columns. In the demo file you will see there is an employee id column to help you link employees to supporting data.
Feel Free to Add Sheets (After the first tab)
You can add sheets after the first tab. You can use cell references or v or x lookups from other tabs to help reference your data to files from human resources or other departments (e.g. looking up addresses, regions, job titles, departments, start dates, end dates, etc.). In the demo excel file the right-most column (without the highlight) has an example referencing mechanism so you can use an xlookup on the data. I provided examples on how to use the xlookup. If you are unaccustomed to the xlookup, look at the way the data is referenced in the sample table, and follow the pattern with your data.
Use Xlookup
Unfortunately, the vlookup function lookups from left to right only, and you are quite limited by this function because the restrictions on the columns, see section on restriction on columns. Use xlookup instead, it is more complicated, but it will reference right to left or left to right.
Signatures
The signatures can either be text-based, image-based, or just left blank for the authorized person to individually sign using whatever signature option they choose in their PDF reader.
There are pros and cons using either approach. Choose one that suits your needs and preferences.
Text Based
The text-based signatures are just text entered into the signature using Playwrite cursive font. The advantage of using a text-based font is that you will not have any issues with images such as scaling, sizing, discolouration when printed, or other defects that come with images. It also is easy to implement, just enter in the name of the authorized person and it will print perfectly.
Imaged Based Signatures
The benefits of imaged based signatures are that will match a person's physical signature, and it is unique to that person. The draw back is that you need to obtain an image that is shaped the ratio of the signature box in the T2200 CRA, which is a 10 by 1 rectangle. It is a wide area compared to the height. It is unusual for people to sign in tight conditions, so if you are using an imaged based signature, you will likely need to resize by a 10 by 1 ratio to ensure it does not have scaling issues. The scaling issue will likely be present with short signatures (people with short names) compared to people with longer names. This is the major drawback of using imaged based signatures.
.PNG file type
Prefer to use PNG file type for imaged based signatures over jpeg or jpg types since the PNG file type has precise reproduction of the image. If a person prints the PDF to paper there will not be any discolouration or other defects. In addition, the PNG tends to have crisper lines of text compared to jpeg file type.
Digitally and Cryptographically Signed PDFs
The application does not support cryptographically signed PDFs.
Can I cryptographically sign PDFs?
There is no requirement from CRA to cryptographically sign PDFs. In addition, if a person wants to modify a T2200 form unlawfully, it is a trivial exercise to circumvent the cryptographically signed PDF by physically printing the PDF make a modification and submit it to CRA when requested. The employer may never identify that it was tampered with unless CRA contacts the employer.
If this is a feature you want, please request it by emailing help@t2200.ca.
Full Guide with Screenshots
There's a quick guide and walkthrough to help you navigate and how to use the application.
Looking for the illustrated walkthrough with screenshots?
See the Step-by-Step Visual Guide